The Drum Modification Thread

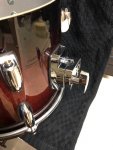
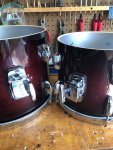
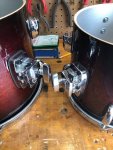
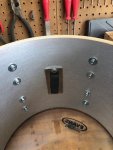
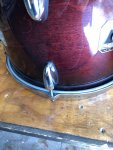
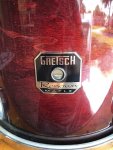
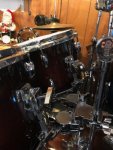
My band gigs a lot and it gets old setting up and tearing down, loading in and loading out, 3 or 4 nights a week so i have been thinking about how to do it with a smaller foot print ( less cymbal stands/less stage space) and lighter to carry. I was going to buy a "travel" kit or something like that but i realized, I have a ton of drums already ( a 12 piece and a 9 piece kit as well as some extra drums) so the first option was to convert a floor tom which i did. Now that is getting old too, the depth being 16 inches can take up valuable floor/stage space. SOOOOO, i decided to cut some drums on my table saw. I took a huge chance not knowing what they would sound like. The first pic without a bass reso was just to see what I had after cutting. I bought new bass lugs and used the existing holes. The next pic is at the first gig recently, now i eliminated the cymbal stand and have a small boom arm in the second tom hole. I also use a cymbal stacker arm on the ride. Last pic to give a little perspective, the bass is only 22X8. The sound is amazing, i feel like i got lucky.20190807_164148.jpg20190815_161316.jpg20190816_113830.jpg
 
My band gigs a lot and it gets old setting up and tearing down, loading in and loading out, 3 or 4 nights a week so i have been thinking about how to do it with a smaller foot print ( less cymbal stands/less stage space) and lighter to carry. I was going to buy a "travel" kit or something like that but i realized, I have a ton of drums already ( a 12 piece and a 9 piece kit as well as some extra drums) so the first option was to convert a floor tom which i did. Now that is getting old too, the depth being 16 inches can take up valuable floor/stage space. SOOOOO, i decided to cut some drums on my table saw. I took a huge chance not knowing what they would sound like. The first pic without a bass reso was just to see what I had after cutting. I bought new bass lugs and used the existing holes. The next pic is at the first gig recently, now i eliminated the cymbal stand and have a small boom arm in the second tom hole. I also use a cymbal stacker arm on the ride. Last pic to give a little perspective, the bass is only 22X8. The sound is amazing, i feel like i got lucky.View attachment 87011View attachment 87012View attachment 87013
I've done exactly that for years. Always wanted a Pacific chameleon kit but could never find one, then Tama came out with the Club Jam Mini and I jumped right on it. But before that I've been playing (and loving) shallow cut drums.
 
My band gigs a lot and it gets old setting up and tearing down, loading in and loading out, 3 or 4 nights a week so i have been thinking about how to do it with a smaller foot print ( less cymbal stands/less stage space) and lighter to carry. I was going to buy a "travel" kit or something like that but i realized, I have a ton of drums already ( a 12 piece and a 9 piece kit as well as some extra drums) so the first option was to convert a floor tom which i did. Now that is getting old too, the depth being 16 inches can take up valuable floor/stage space. SOOOOO, i decided to cut some drums on my table saw. I took a huge chance not knowing what they would sound like. The first pic without a bass reso was just to see what I had after cutting. I bought new bass lugs and used the existing holes. The next pic is at the first gig recently, now i eliminated the cymbal stand and have a small boom arm in the second tom hole. I also use a cymbal stacker arm on the ride. Last pic to give a little perspective, the bass is only 22X8. The sound is amazing, i feel like i got lucky.View attachment 87011View attachment 87012View attachment 87013

Great work! Your cut down drums looks like an expensive bop kit you'd see in the shops.

Quick question for the OP or anyone who knows...I also just recently converted a 16x16 floor tom to bass drum, and when mic'd and EQ'd it sounds impressive. Now I'm wondering how a cut-down kick drum, say 20x6, would compare? What's the difference? Is it worth it? Or should I just stick with the converted floor tom?

I'm a drummer living and working in the Tokyo area, so anyway I can lighten my load for train travel is a plus.

In my continued quest for portability I have played both 'standard depth' small drums and shallow depth 'normal size' drums (my most recent examples being 18x7 and 16x14, with a 20x10 before those) and personally really prefer a smaller but deeper drum sound wise. 16 depth x 12-14 diameter seems to be my sweet spot. I find shallow drums speak too quickly to carry a deep note and my large diameter shallow bass drums always had plenty of punch but no bottom end and weird tuning inconsistencies. With the same shells, heads, tuning, and room I can easily make a 16x14 into a room filling, chest thumping cannon even without mics where as my 18x7 and 20x10 always needed a mic and plenty of EQ time. Not to say a 16" is 'loud' but it does cut which is an important distinction.
 
Thank you for the reply. You might have just saved my marriage!? Wife officially banned me from any more drum purchases a while back. You've now convinced me to just stick with this converted 16x16 floor tom. I'd installed the Evens EMAD head and was slightly underwhelmed by it all. But the first gig we played I was definitely impressed with the bass the sound guy was able to coax from it. If only all our shows could have a nice PA and soundguy?
Now I can focus on purchasing more cymbals. Wife didn't say anything about them?

The emad is a great head, especially in mic'ed scenarios HOWEVER I've grown to really love the eq4. It gives me the same level of focus and punch I get from the emad when mic'ed but is made of a slightly different film that lends a boost to the drum's natural volume while overall making a more versatile drum (to me). Regardless, the emad is great and should serve you well and I'm happy that all worked out.
 
EMADs are great 'til they start to rattle....

Thank you!!!

EQ4 all day: same punch, more volume, more tone, more versatile, usually cheaper, should last longer under the same conditions (vs rattling plastic tray on the emad). I know evans has fixed the issue of the plastic trays separating and falling off but they do still start to rattle after awhile, especially if you change tunings frequently or swap the head from drum to drum.

Love your website btw, not sure if I've said that or not before.
 
Last edited:
So, I have a spare snare that was the original to my kit from the late 80's (Ludwig Rocker) that was needing a little TLC. One issue was the bosses that the screws go into on the lugs kept breaking. First is was one and a bout a year later another, then they all started failing. (the one on the right still has one screw boss left), so I decided to pull all of them and replace all the lugs.
Rocker-Snare-2.jpg
When I got the drum apart, I got the thought in my head that now would be a good time to do a refinish, as a chrome same is pretty ordinary.Rocker-Snare-1.jpg
Came up with a way to utilize the chrome with some new graphics and add some color with some transparent and matte vinyl (and a love for pinstriping!)
Rocker-Snare-4.jpg
First step was to wrap over the chrome with the transparent blue...Rocker-Snare-5.jpg
For the graphics, I made a template of the drum and laid out some stock pinstripe graphics (normally I would have hand painted this, but I wanted this to be done in a couple hours)Rocker-Snare-3.jpg
After cutting these designs on matte black wrap film, I reverse weeded them so the blue chrome would show through and this was the end result. Not too bad for a couple of hours work.Rocker-Snare-9.jpgRocker-Snare-8.jpgRocker-Snare-6.jpg
 
So, I have a spare snare that was the original to my kit from the late 80's (Ludwig Rocker) that was needing a little TLC. One issue was the bosses that the screws go into on the lugs kept breaking. First is was one and a bout a year later another, then they all started failing. (the one on the right still has one screw boss left), so I decided to pull all of them and replace all the lugs.
View attachment 89765
When I got the drum apart, I got the thought in my head that now would be a good time to do a refinish, as a chrome same is pretty ordinary.View attachment 89766
Came up with a way to utilize the chrome with some new graphics and add some color with some transparent and matte vinyl (and a love for pinstriping!)
View attachment 89767
First step was to wrap over the chrome with the transparent blue...View attachment 89769
For the graphics, I made a template of the drum and laid out some stock pinstripe graphics (normally I would have hand painted this, but I wanted this to be done in a couple hours)View attachment 89770
After cutting these designs on matte black wrap film, I reverse weeded them so the blue chrome would show through and this was the end result. Not too bad for a couple of hours work.View attachment 89771View attachment 89772View attachment 89773

That looks freaking awesome! I will say I think the blue alone with the chrome underneath would look fantastic also.

Is the vinyl the same as automotive vinyl wrap? And did you have to glue it or anything to the shell?
 
That looks freaking awesome! I will say I think the blue alone with the chrome underneath would look fantastic also.

Is the vinyl the same as automotive vinyl wrap? And did you have to glue it or anything to the shell?

Thanks! Yeah, I was thinking it wasn't looking bad just blue, but the kit it will get used on is black, so that was the logic for going that route. And yes, the black is 3M 1080 color change wrap, and the blue is Oracal 8300 transparent. The blue doesn't have air release and isn't that conformable - going over the badge almost caused some big wrinkles, but I worked through it.
 
This is the lovely Beulah Mae. She started life as two sets of early 1960's Whitehall drums. The bass drum is believe it or not 3 Ply Maple-Luan-Maple, the rest are your standard Luan shells, all with reinforcing rings. But there ends the similarity to Asian firewood. I reconditioned all the shells, painted the interiors with faux stone finish and then a layer of laquer over that. Then I re-cut the bearing edges to a modern double 45, finally finishing the exteriors with a custom designed wrap. I also took one of the 13x9 rack toms and converted it into a snare drum, carving out the snare bed by hand. The two octabans are made from special ordered extruded clear pvc.

The interior shell treatment increased the resonance and made the drums a bit brighter overall. Still, even with clear 10 mil single ply heads (Georgia Phil brand, built to Remo Ambassador spec) they retain an overall warm vintage character. They don't project like my Slingies, I mean lets face it, luan has a beautiful natural dark and warm character, but it's lightweight and porous, it will never project like maple or birch, but still the sound character of these drums is wonderful and unique. And once you mic them up, projection is not an issue anyway.

She has been my main gigging kit for years and aside from the occasional fitting working loose from time to time (50 year old hardware whaddya gonna do), she's never let me down. I take care of Beulah and she takes care of me, and boy you should see the crowd reaction when they see her in her full glory under stage lights.

FlameLoversDrums.jpg
 
Last edited:
This is the lovely Beulah Mae. She started life as two sets of early 1960's Whitehall drums. The bass drum is believe it or not 3 Ply Maple-Luan-Maple, the rest are your standard Luan shells, all with reinforcing rings. But there ends the similarity to Asian firewood. I reconditioned all the shells, painted the interiors with faux stone finish and then a layer of laquer over that. Then I re-cut the bearing edges to a modern double 45, finally finishing the exteriors with a custom designed wrap. I also took one of the 13x9 rack toms and converted it into a snare drum, carving out the snare bed by hand. The two octabans are made from special ordered extruded clear pvc.

The interior shell treatment increased the resonance and made the drums a bit brighter overall. Still, even with clear 10 mil single ply heads (Georgia Phil brand, built to Remo Ambassador spec) they retain an overall warm vintage character. They don't project like my Slingies, I mean lets face it, luan has a beautiful natural dark and warm character, but it's lightweight and porous, it will never project like maple or birch, but still the sound character of these drums is wonderful and unique. And once you mic them up, projection is not an issue anyway.

She has been my main gigging kit for years and aside from the occasional fitting working loose from time to time (50 year old hardware whaddya gonna do), she's never let me down. I take care of Beulah and she takes care of me, and boy you should see the crowd reaction when they see her in her full glory under stage lights.

View attachment 89943

Brought a tear to my eye like those ASPCA commercials. That's a bond you've got there that not many would understand.
 
I bit the bullet and removed the huge tom mounts from my Gretsch Renown toms, 10 and 12. I don't use the 8 much so it can wait. Took about an hour, not counting the trip to Ace hardware for new screws. Drilled and thrilled. This will enable me to change heads without removing the toms from the mount. First step, of course, remove heads, remove mount, separate two parts of mount. I used the plate with the rubber pad as a washer/brace on the inside of the toms, rather than two washers. I hope it will be a little stronger. I had to buy 10-32, by 1 inch machine thread to go into the mount. One small washer, then the plate, and threaded into the tom mount. Reminder. Do your self a favor and put painters tape on the inside and out of the shell where you plan to drill. Not one bit of tear out with four holes. Small hole first all of the way through, then hole big enough for the 10-32 screw. Please ask any questions. I was very happy with the result, and they sound fine. Some tweaking to do but new heads coming Monday, so they will remain. Youtube video to follow.
 

Attachments

  • IMG_9377.jpg
    IMG_9377.jpg
    63.6 KB · Views: 22
  • IMG_9379.jpg
    IMG_9379.jpg
    83.1 KB · Views: 23
  • IMG_9380.jpg
    IMG_9380.jpg
    81.1 KB · Views: 21
  • IMG_9381.jpg
    IMG_9381.jpg
    61.8 KB · Views: 20
  • IMG_9382.jpg
    IMG_9382.jpg
    69.4 KB · Views: 18
  • IMG_9383.jpg
    IMG_9383.jpg
    77.3 KB · Views: 23
  • IMG_9384.jpg
    IMG_9384.jpg
    68.1 KB · Views: 23
I bit the bullet and removed the huge tom mounts from my Gretsch Renown toms, 10 and 12. I don't use the 8 much so it can wait. Took about an hour, not counting the trip to Ace hardware for new screws. Drilled and thrilled. This will enable me to change heads without removing the toms from the mount. First step, of course, remove heads, remove mount, separate two parts of mount. I used the plate with the rubber pad as a washer/brace on the inside of the toms, rather than two washers. I hope it will be a little stronger. I had to buy 10-32, by 1 inch machine thread to go into the mount. One small washer, then the plate, and threaded into the tom mount. Reminder. Do your self a favor and put painters tape on the inside and out of the shell where you plan to drill. Not one bit of tear out with four holes. Small hole first all of the way through, then hole big enough for the 10-32 screw. Please ask any questions. I was very happy with the result, and they sound fine. Some tweaking to do but new heads coming Monday, so they will remain. Youtube video to follow.

Nice, I've always been an advocate of shell mounted hardware. Clean job there.

I'm planning on doing the same to my 10" pearl midtown tom (not that I use it that often anyway).
 
. Doesn’t sound as good as I thought with the iPhone but not any worse than before. Sounds a bit better on Youtube but still tuning to do.
 
Last edited:
Just posting in general ... but iphone videos are useless to demo drums and cymbals. The Automatic Gain Control circuit will turn down (limit) the initial strike tone and then turn up the sustain giving a completely inaccurate picture of the sound.

Look at the photo. The top graphic is what you will hear using the iPhone while the bottom is the true sound.
 

Attachments

  • 633503F9-6893-4215-8EBE-79136E3840CD.jpeg
    633503F9-6893-4215-8EBE-79136E3840CD.jpeg
    311.1 KB · Views: 1
I'm planning on doing the same to my 10" pearl midtown tom (not that I use it that often anyway)

I put mine in a snare basket to my left. My basket is old style with the slider arm, so the basket is way too big. Put some hair rubber bands around the lug screws and basket fingers and Boom! it doesn't move at all.
 
Drum mod. Update. After careful planning and measuring and drilling, the elimination of the drum mounts became a problem when I couldn't get the toms quite where I wanted them. They may have worked had I flown them from cymbal stands but not my double tom holder.. No regrets and the sound was fine, but the placement was not. Back to the drawing board.
 
Back
Top