Hardware DIY/Mods/Repairs Thread

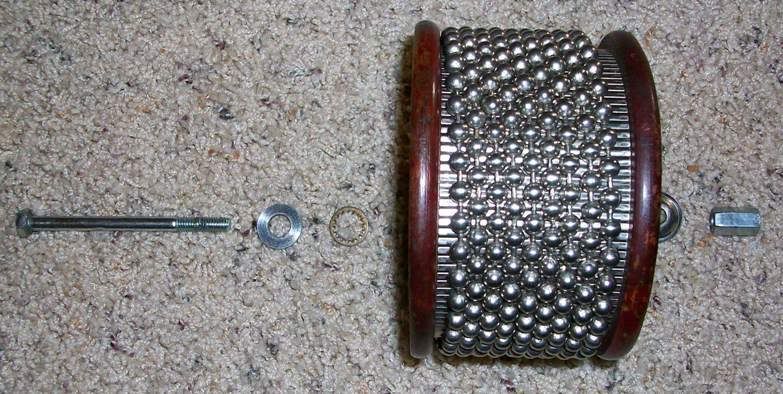
tbmills asked me how I made a foot-pedal cabasa mod. Here it is. You may need a vise and hacksaw to cut the carriage bolt. The method is probably similar for many different pedals. Obvioulsy, you will need to take the cabasa and pedal into a hardware store to assemble all the correct parts and check fit. You will need LocTite to keep the cabasa from loosening during use.
Explodedview.jpg

Exploded view of mounting system. From left: carriage bolt, washer, lock washer, cabasa, washer, deep nut.
Beaterup.jpg

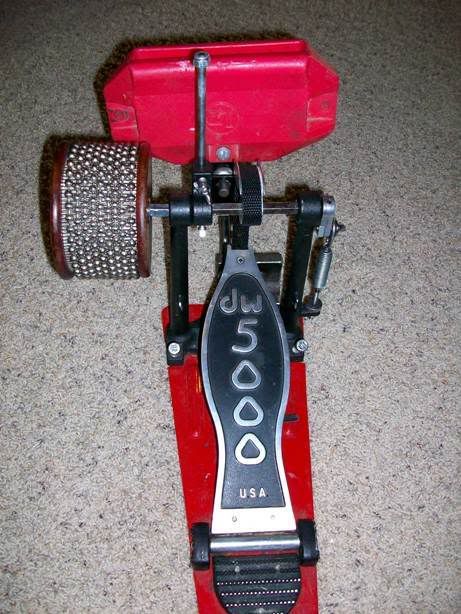
Mounted cabasa. One end of the deep nut secures the carriage bolt, while the other end screws to the end of the pedal axle. I also modified the beater, threading each end and putting a lock bolt on each end and welding a wing nut to the tension bolt that secures the beater. This allows me to retract the beater by hand for cabasa-only playing, or to extend the beater for cabasa/block playing.
Beaterdown.jpg

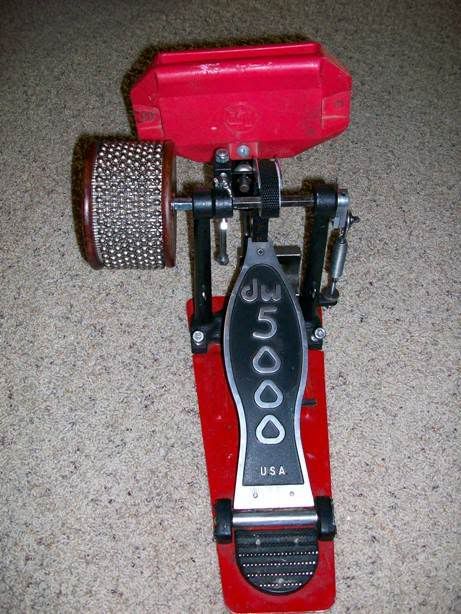
Beater retracted for cabasa-only playing. This option is an improvement over the Meinl version, as it's a one-trick pony. My option allows use of another bell or block.
 
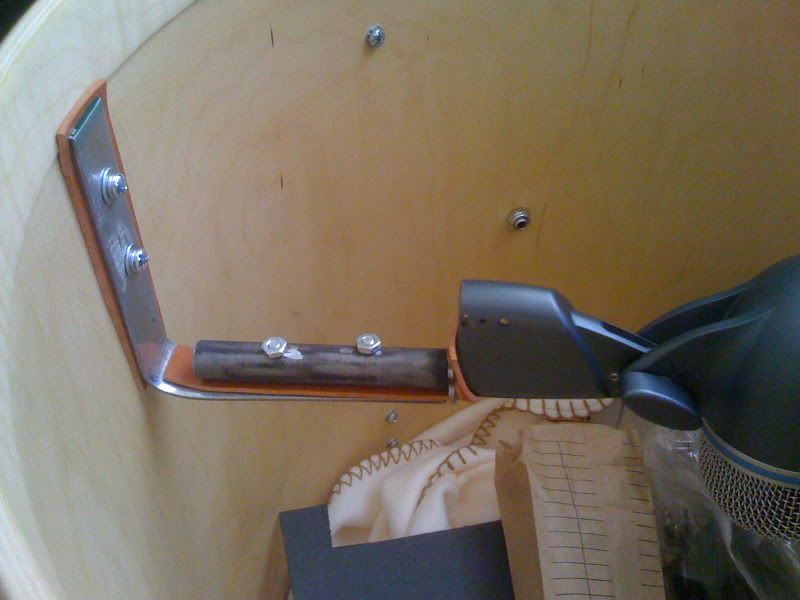
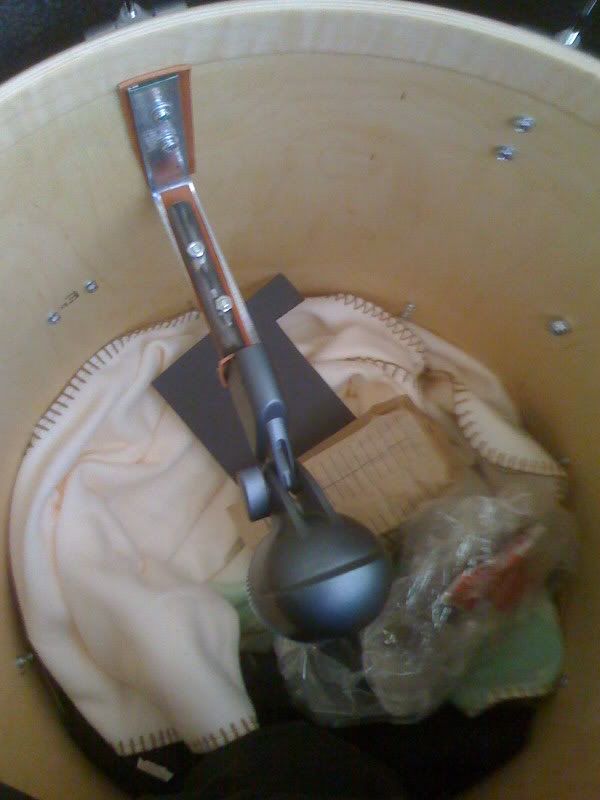
I was reading up on internal micing and decided to make a internal mic mount for the Beta 52, So i took a L bracket and drilled 2 holes to correspond with one of the lugs on my bass drum, then took a mic stand cut it off to the desired length and drilled two holes in it and the other end of the bracket, putt a rubber gasket between the two metals, and one between the drum and the metal. Not the best looking one but cheaper than a Shu.. all in all totaled out at 11.00. I painted silver due to the fact i could not find any black paint around the house, then the next day i found a post from a guy on here that made one w/ plexi-glass and it looks sweet, so I am on the hunt for the parts to make one like it...
IMG_0103.jpg

mine2.jpg

mine.jpg
 
I was reading up on internal micing and decided to make a internal mic mount for the Beta 52, So i took a L bracket and drilled 2 holes to correspond with one of the lugs on my bass drum, then took a mic stand cut it off to the desired length and drilled two holes in it and the other end of the bracket, putt a rubber gasket between the two metals, and one between the drum and the metal. Not the best looking one but cheaper than a Shu.. all in all totaled out at 11.00. I painted silver due to the fact i could not find any black paint around the house, then the next day i found a post from a guy on here that made one w/ plexi-glass and it looks sweet, so I am on the hunt for the parts to make one like it...

Good work. But where does the cable go?
 
I was reading up on internal micing and decided to make a internal mic mount for the Beta 52, So i took a L bracket and drilled 2 holes to correspond with one of the lugs on my bass drum, then took a mic stand cut it off to the desired length and drilled two holes in it and the other end of the bracket, putt a rubber gasket between the two metals, and one between the drum and the metal. Not the best looking one but cheaper than a Shu.. all in all totaled out at 11.00. I painted silver due to the fact i could not find any black paint around the house, then the next day i found a post from a guy on here that made one w/ plexi-glass and it looks sweet, so I am on the hunt for the parts to make one like it...

Nice work, but WHY are you usind a DW for a trash can?
 
Sorry for delay, yes it was the nuts bolts package., and i no longer use that mount, it was puttingto much weight on the two bolts of one lug, now i use and reccomend this to everyone....
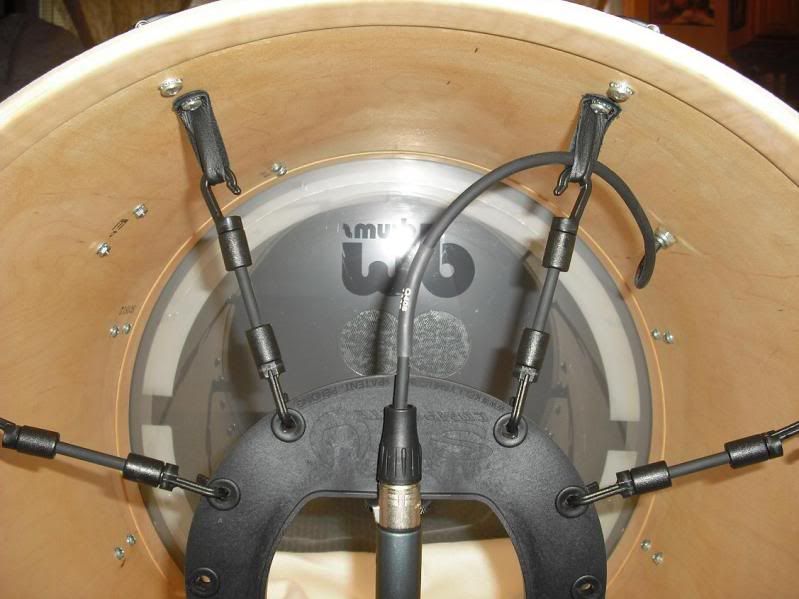
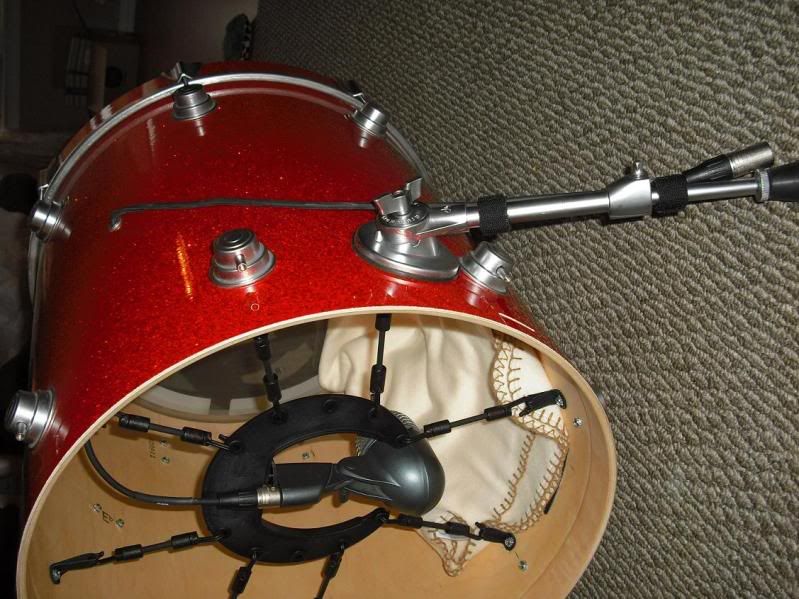
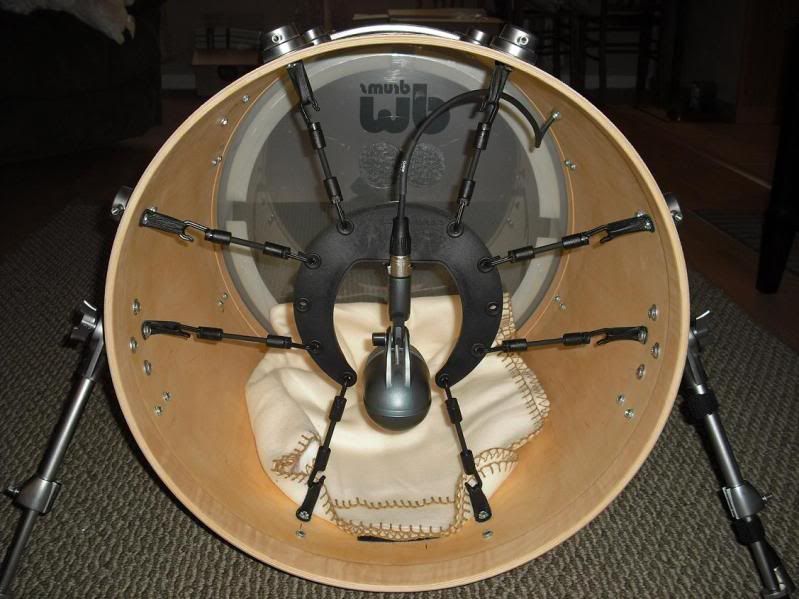
First off this thing is awesome, this cuts 15 minutes off my setup time. Its called the kelly Shu and you can learn more at www.kellyshu.com , it comes in two types and aluminum and a composite version I opted for the composite version For on $51 + 10.00 S+H= 62.00US. The pictures really explain it all. it took about 10 minutes to install, and was very easy. It is a interior shock mounted microphone mount. Before i had rigged one that was just mounted on one lug and i was worried about the stress is was causing, trust me i didnot want to see my DW kick crack, so i purchased THe Shu and it spreads the wait evenly around the drum to many lug screws. It is easy to adjust and works with any mic, i am seriously considering getting 3 more to put in my toms, the only drums it does not work with is Peavey radials...
i attached an image of my earlier attempt at a interior mount. Also i dint have to drill any hole for the mic cable i just removed the XLR end and ran it through the existing vent hole and re sodered and i am ready to go. So check out the pics and check there website, this is a great produst and i give it an A++++++
here is a link showing how it is installed and the many different setups....
http://www.youtube.com/watch?v=VjnXVcAjCtE
old ...
mine.jpg

NEW!!!!!!!!
CIMG0959.jpg

CIMG0960.jpg

CIMG0959.jpg

CIMG0958.jpg


kelllyyyy.jpg
 
Sorry for delay, yes it was the nuts bolts package., and i no longer use that mount, it was puttingto much weight on the two bolts of one lug, now i use and reccomend this to everyone....
First off this thing is awesome, this cuts 15 minutes off my setup time. Its called the kelly Shu and you can learn more at www.kellyshu.com , it comes in two types and aluminum and a composite version I opted for the composite version For on $51 + 10.00 S+H= 62.00US. The pictures really explain it all. it took about 10 minutes to install, and was very easy. It is a interior shock mounted microphone mount. Before i had rigged one that was just mounted on one lug and i was worried about the stress is was causing, trust me i didnot want to see my DW kick crack, so i purchased THe Shu and it spreads the wait evenly around the drum to many lug screws. It is easy to adjust and works with any mic, i am seriously considering getting 3 more to put in my toms, the only drums it does not work with is Peavey radials...
i attached an image of my earlier attempt at a interior mount. Also i dint have to drill any hole for the mic cable i just removed the XLR end and ran it through the existing vent hole and re sodered and i am ready to go. So check out the pics and check there website, this is a great produst and i give it an A++++++
here is a link showing how it is installed and the many different setups....
http://www.youtube.com/watch?v=VjnXVcAjCtE
old ...

Very nice work. You might want to look at putting a female tip-ring-sleeve connector in the air hole vent and wiring the interior mic cable up to that. Then put a male TRS connector on the other end of the power cable. Then, all you'd have to do is "plug in" your bass drum and you'd never have a mic cable dangling out of it. I wired one up and the mod is on this thread somewhere.
 
Very nice work. You might want to look at putting a female tip-ring-sleeve connector in the air hole vent and wiring the interior mic cable up to that. Then put a male TRS connector on the other end of the power cable. Then, all you'd have to do is "plug in" your bass drum and you'd never have a mic cable dangling out of it. I wired one up and the mod is on this thread somewhere.

Great idea...i hav thought about that, and probably eventually might, but TRS connectors scare me a bit..I mean i think the XLR has a more.......quality, balanced signal. I would love to just drill out for an recessed xlr mount plug in, i am just not up to drilling in the drum.. Thanks
j
 
Great idea...i hav thought about that, and probably eventually might, but TRS connectors scare me a bit..I mean i think the XLR has a more.......quality, balanced signal. I would love to just drill out for an recessed xlr mount plug in, i am just not up to drilling in the drum.. Thanks
j

TRS, also known as stereo quarter-inch, is XLR. Don't confuse TRS with a standard mono instrument plug. TRS was developed to carry XLR signals into mixing boards and other places where XLR plugs and sockets take up too much room. Look at wiring diagrams and you'll see TRS is the same as XLR in terms of signal and wiring and shielding; the only thing different is the plugs. You could do away with XLR plugs and just use TRS, but most mics still use XLR. The Tip, Ring and Sleeve of TRS each carry one of the three XLR pin signals.

You could do this mod if you had a soldering iron and you will have to order a 90-degree TRS plug to fit under the drum, but it is a pretty easy mod and it's cool just to be able to "plug in" your bass drum!

Awesome, i think i will do this, I would just need to get a new TRS connector to install on drum and a TRS 90 degree 3' long to xlr to plug into snake, thanks so much!!
 
Awesome, i think i will do this, I would just need to get a new TRS connector to install on drum and a TRS 90 degree 3' long to xlr to plug into snake, thanks so much!!

Have fun with that. The nice thing is that there is no permanent modification to the drum and it is completely reversible. Just remember to take your custom cord with you because sound guys likely won't have that connection.
 
Cy012.jpg


"As you can see, I have made an x-hat, the way someone (I can not remember who) did here on the forum. That was a great way to make an x-hat! Thanks!"


Can you give feedback on how to do this? I can't seem to find any threads on how to make a x-hat.
 
"As you can see, I have made an x-hat, the way someone (I can not remember who) did here on the forum. That was a great way to make an x-hat! Thanks!"

Can you give feedback on how to do this? I can't seem to find any threads on how to make a x-hat.

I'm not sure I know what you mean by "x-hat." Do you mean a secondary hihat not connected to a foot pedal, stays closed all the time? If that is what you mean, fourstringdrums has some descriptions of that early in this thread.
 
The pipe from Home Depot is raw conduit. Aluminum I believe. It would have to go to a special shop to give it a shiny finish according to a friend of mine. He suggested I paint it, but I doubt paint would hold up after some abuse with clamps and what not. I'm not too, too worried about it being bright and shiny. After all, most of what I do is just in my music room. I don't expect to do much gigging any time soon and if I did, I doubt someone would walk out of the bar because I was using raw conduit instead of chrome plated tubing. heheh I was wondering if I could just buff it out, but my friend said I couldn't. I could always just replace my entire rack with the conduit and resell the Gibraltar tubing to make everything match. The hardware on my kit is black, and the super shiny chrome doesn't entirely match to my eyes.

I do want to bring a clamp in to check. Gibraltar tubing is 1.5". I know they have that in the conduit. But ya, there may be a slight difference. Next time I go to Home Depot I'll bring a clamp. I'm pretty sure you can get end caps there as well. Only one of my current rack tubes has an end capped. All of the horizontal bars terminate into T clamps, and two of my three vertical bars have boom arms on top to hold crashes. The leg tubes have 'feet' caps on them as well. So in my case, caps aren't too much of a concern though it is something to consider for the overall project.

I really like the idea of having custom length tubes to fit exactly how I want. I've been wanting a third side to my rack as well, so I can convert my hat stand into a legless one and mount a cymbal or two, or something over there. I have extra clamps now which warrant something new to add to the line up. hahah!

I just finished the construction of a straight rack using 1 1/4" EMT conduit from my local Lowe's. The EMT conduit is a light steel and the 1 1/4" refers to the inside diameter. The outside diameter however, is exactly 1.5" inches and my Gibraltar clamps fit perfectly! I have mounted 3 toms and 5 cymbals to it and I will let them sit there for 48 hours to ensure no slippage or loosening under the weight before I even attempt to start playing. I used the corresponding joining sleeves EMT 1.25" and the 90 degree elbows also in 1.25".
These were in turn connected to the pre welded "T" sections that I cut from an old chain link security gate that the elbows and sleeves fit over (just barely). Later this week I am going to drill the sleeves and main pipes and elbows to accomodate 1/4" X 2" carriage bolts and wing nuts for added stability. If I encounter any slippage with the gibraltar clamps, I will add friction tape underneath to add dimension and adhesive resistance to the mounting bar. I'll post pics along the way!!

UPDATE: I have now added the 1/4"X 2" bolts w/ wing nuts for added stability, and have now made the cosmetic changes with black gloss paint. I am still working on some ideas for my "kick snare". If anybody has any ideas please let me know!!
 

Attachments

  • PICT0163.JPG
    PICT0163.JPG
    87.3 KB · Views: 5,954
  • PICT0164.JPG
    PICT0164.JPG
    88.8 KB · Views: 5,864
  • New drum rack768x1024.jpg
    New drum rack768x1024.jpg
    80.1 KB · Views: 5,884
  • PICT0172.JPG
    PICT0172.JPG
    37.4 KB · Views: 5,778
  • PICT0181.JPG
    PICT0181.JPG
    74.7 KB · Views: 5,886
Last edited:
I recently replaced my old Zildjian planet z 13" beginner hi-hats with ZXT series 14". My older stand that came with my Accent CS kit wasn't designed for that weight, so I replaced the stand with a new heavy duty Ludwig hat stand. I decided to keep the old stand, and put to use with my Stagg tambourine. I cut the legs off the lighter stand, and the mounting rod so that it would fit underneath the bigger stand.I used a mapex expandable double end clamp and attached the 2 hat stands together. I then clamped on the tambourine, and "wah-la!" a foot activated tambourine! I placed cymbal felts underneath to minimize any click sounds that would result from hard plastic striking metal. I also took 2 GPS flexible mounting brackets, cut the suction cups off, and with 2 "U-Bolts" clamped them vertically to the heavier hat stand... the top one holds my Sony PSP that I now use to view video lessons or to accompany practice music with, while the lower clamp holds my Korg metronome. I also added a vehicle window mounted beverage holder to hold my water bottle, and my pro mark stick holder to hold my main pair of sticks. Now I have what I call a "HAT COMMAND POST" to hold everything within easy reach as I play. I'm now currently working on a way to play my Pearl piccolo snare with an old foot pedal as an accent to my main Ludwig snare. I'll post that project later!
 

Attachments

  • PICT0165.JPG
    PICT0165.JPG
    95.8 KB · Views: 5,916
I recently replaced my old Zildjian planet z 13" beginner hi-hats with ZXT series 14". My older stand that came with my Accent CS kit wasn't designed for that weight, so I replaced the stand with a new heavy duty Ludwig hat stand. I decided to keep the old stand, and put to use with my Stagg tambourine. I cut the legs off the lighter stand, and the mounting rod so that it would fit underneath the bigger stand.I used a mapex expandable double end clamp and attached the 2 hat stands together. I then clamped on the tambourine, and "wah-la!" a foot activated tambourine! I placed cymbal felts underneath to minimize any click sounds that would result from hard plastic striking metal. I also took 2 GPS flexible mounting brackets, cut the suction cups off, and with 2 "U-Bolts" clamped them vertically to the heavier hat stand... the top one holds my Sony PSP that I now use to view video lessons or to accompany practice music with, while the lower clamp holds my Korg metronome. I also added a vehicle window mounted beverage holder to hold my water bottle, and my pro mark stick holder to hold my main pair of sticks. Now I have what I call a "HAT COMMAND POST" to hold everything within easy reach as I play. I'm now currently working on a way to play my Pearl piccolo snare with an old foot pedal as an accent to my main Ludwig snare. I'll post that project later!

Dude, you got it goin' on! I'm impressed with your rack system and concept for turning the hihat into a central command post. Very good design and execution if I do say so myself.
 
This thread gave me inspiration for my weekend project. Here you go:

Allow me a moment to set the stage for the following mod. Nothing is more aggravating than the time it takes to set up our kits, right? Of course. Now add on the additional time it takes to mic the drums externally, run cords, etc, etc. Before you know it, you've added quite a bit of time to a normally long sequence of events as it is. And we all know that mics cost quite a bit of money and nothing sinks the heart faster than whacking the crap out of your brand new Shures in an exuberant Dave Weckl/Carter Beauford inspired drum roll while doing an overplayed cover of Stairway to Heaven at the end of a three hour show in August in the heat...ah, I digress.

Anyway, after looking at quite a few manufactures products for mic'ing internally, I decided to take advantage of a rainy evening and a couple of trips to Home Depot later...voila, here you go.

Here's what I started with.
7331_1146863357892_1416801047_30391031_951121_n.jpg


I started off with the part I needed to fab myself. A regular wall shelve support bracket from Home Depot. Unfortunately, it did not bend the way I need it to, so I got to buy a blow torch as well.

That was the fun part. Now I can light my stoogies with NO problem.
7331_1146863677900_1416801047_30391032_7836280_n.jpg

7331_1146863957907_1416801047_30391033_5601012_n.jpg

7331_1146864317916_1416801047_30391035_3861124_n.jpg


The next part is a little tricky. Take apart the mic cable, feed the FEMALE end into the drums port hole and reassemble. I bring attention to this little step since I fed the male end in...TWICE. So now I'm an expert at soldering.

It should look like this.
photo.php


Here's the mounting bracket that I fabbed earlier, painted and installed. Also, the bulge on the wire is simply a band of electrical tape wrapped around the cable larger than the port hole so the cable won't pull back out. I also used a "hi-tech bonding strap" (bread package twist tie) to keep the cable up and away from making contact with the drum head.
7331_1146866677975_1416801047_30391039_4910730_n.jpg

Almost there:
7331_1146866877980_1416801047_30391040_1061654_n.jpg

Here's the mount in place covering the port hole and hiding the cable's exit somewhat.
7331_1146867197988_1416801047_30391042_3498773_n.jpg

Finished product with cable attached.
7331_1146867517996_1416801047_30391044_4396907_n.jpg


A couple of small things:
I probably could have ordered longer lug bolts but didn't feel like waiting, so I tapped the lugs to a 32 and run a longer #8 32 bolt.
I left the longer cable attached so it runs straight from the drum, across my rack, and into my personal mixer. I did this for a couple of reasons. First, if I cut a smaller cable, I'm right back to having to attach a number of cables and back to the time issue. This way, I can mount the drum directly on the rack, route the cable to the mixer before adding the cymbals to the rack and BAM, it's done. And secondly, it was just easier.
And finally...wear eye protection, solder splatters when dropped.

Anyway, there you have it. Total cost invested:
4 pack of "L" clamps - $2.98
Black spray paint - $.98
Longer bolts, nuts, washers to do all drums - $3.98
Blow torch - $19.98


Total - around $30 after taxes (not counting cost of beer) $95 after beer.
Time spent - about 10 minutes per drum average. The first one took about 1/2 hour re-soldering the same cable three different times!
 
Last edited:
This thread gave me inspiration for my weekend project. Here you go:

Allow me a moment to set the stage for the following mod. Nothing is more aggravating than the time it takes to set up our kits, right? Of course. Now add on the additional time it takes to mic the drums externally, run cords, etc, etc. Before you know it, you've added quite a bit of time to a normally long sequence of events as it is. And we all know that mics cost quite a bit of money and nothing sinks the heart faster than whacking the crap out of your brand new Shures in an exuberant Dave Weckl/Carter Beauford inspired drum roll while doing an overplayed cover of Stairway to Heaven at the end of a three hour show in August in the heat...ah, I digress.

Anyway, after looking at quite a few manufactures products for mic'ing internally, I decided to take advantage of a rainy evening and a couple of trips to Home Depot later...voila, here you go.

Really cool idea and execution.

If you really wanted to add a nice touch - and since you solder - make it so you can plug in your drums in the same way a guitarist plugs in his acoustic guitar. It will blow some minds (at least among people who pay attention to such things).

For each drum, get a quarter-inch male stereo plug and a quarter-inch female stereo socket. As you may know, quarter-inch stereo (also called Tip-Ring-Sleeve or TRS) is the exact same wiring as XLR, except it won't carry phantom power, but that is not a concern since you are using dynamic mics. People plug dynamic mics into quarter-inch stereo all the time.

Install the quarter-inch stereo socket in the vent hole of the drum; it will fit perfectly in the vent hole. Cut the mic cable a foot or so from the mic end and solder the end to the female socket inside the drum. Next solder the male plug to the end of the outside mic cable. I recommend 90-degree male plugs so you don't have to worry about accidentally hitting the plug and damaging a connection. Not many audio stores will carry these so you may need to order them, about four bucks each.

This way, you will be left with no cables dangling from the drums. When you want to mic up your set, you simply "plug in" your drums! You will need to carry these cables with you as most sound guys won't have them, but the XLR end will connect to any XLR cables if you need a longer run. You will need to Google search some wiring diagrams to make the correct connections between XLR and TRS. This project and some more beer will keep you busy for an afternoon!

See this thread entry of 02-14-07 for an explanation with photos of how I did this, as well as my set thread below.
 
Back
Top